Here’s an easy-to-read, beginner-friendly guide to Git with lots of examples.
Git looks hard at first, but it’s not. I’ve tried Tower Git client and SourceTree GUI, but found them to be not much easier to use than from the command prompt.
The basics
Make directory and initialize a repository in it:
$ mkdir my-git-test && cd my-git-test
$ git init
Note that the following only creates the repo on your local machine, not on GitHub, of course.
Now the repo is up, check what’s happening with it:
$ git status
On branch master

Initial commit

nothing to commit (create/copy files and use "git add" to track)
Nothing much, yet. Make some test files to your repository:
$ touch file-{1..10}.htmlThen check the status again:
$ git status
On branch master

Initial commit

Untracked files:
    (use "git add <file>..." to include in what will be committed)

    file-1.html
    file-10.html
    file-2.html
    file-3.html
    file-4.html
    file-5.html
    file-6.html
    file-7.html
    file-8.html
    file-9.html

nothing added to commit but untracked files present (use "git add" to track)
Let's imagine we want to commit these new files. First we need to add them.
Adding files
Next, the new files need to be added to the staging area so they can be
committed later. There is more to adding files than first meets the eye; the
Git staging area guide goes
deeper into the different ways git add can limit its scope. Here are some
common add commands:
$ git add <filename> # Add a specific file
$ git add .          # Add all changed files
$ git add -u         # Add untracked new files
$ git add -A         # All untracked new files and all changed files
In this case, since we only have new untracked files, git add -u would fit the
bill perfectly. But in reality, 99% of the time it's easier to use the -A
flag: $ git add -A to just add everything. Go ahead and do so.
Now check the status again:
$ git status
On branch master

Initial commit

Changes to be committed:
    (use "git rm --cached <file>..." to unstage)

    new file:   file-1.html
    new file:   file-10.html
    new file:   file-2.html
    new file:   file-3.html
    new file:   file-4.html
    new file:   file-5.html
    new file:   file-6.html
    new file:   file-7.html
    new file:   file-8.html
    new file:   file-9.html
Now it says "Changes to be committed", instead of "Untracked files". Next up: committing.
Committing changes
Now that all the files have been "staged" (added to the staging area with
add), the syntax for commit is:
$ git commitThis commits all the files that were added before. If someone now looks at the commit history of this repo, they have no idea what changed in that commit (without looking at the files), so we better add a message to inform everybody of the changes:
$ git commit -m "Short description what was changed"The -m flag stands for message and the bit wrapped in quotes after it is the
actual message. If you only need to correct the latest commit, you can
amend it instead of creating a new commit.
It might suck to type a long message in the prompt. If you leave out the
-m and the message, and hit enter, git will pop open Vim right there in the
terminal, and you can type the message in using Vim, where you can have spell
check what not:
$ git commitHere you see what the Vim looks like: it shows you the files that have changed, and I have written a sample commit message there.
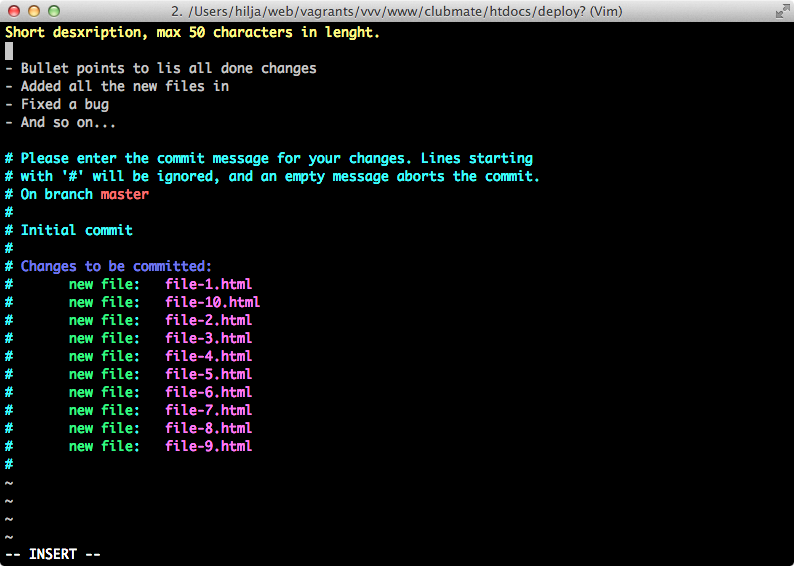
The summary line should be no more than 50 characters long, and the rest should wrap at 72 characters. Writing good commit messages is a post of it's own, but have a look at this comprehensive commit message guide.
After the message is ready, just save and exit (below is how to do that).
Vim briefly
Vim is a beast, and might throw a neophyte off at first.
There's two modes in Vim (actually there’s more, but two that matter in this case):
- Command mode: saving and copying, for instance, happens in this mode
(press
escto get there) - Insert mode: code editing happens in this mode (press
ato get there)
After the commit message is ready, press Esc to enter command mode, then type
:wq (write and quit) or :x (the same thing), and press Enter.
More on exiting Vim here,
and a
tutorial here.
If Vim feels too enigmatic, the default editor can be changed, for instance to nano:
$ git config --global core.editor nanoOr to Sublime Text for that matter:
$ git config --global core.editor "open -a 'Sublime Text'"Put it online
So far, the code is only on your hard drive. You might want to put it on the Internet for everyone to see and fork. Head to GitHub or BitBucket (or other such service) and make a repository.
After the repo is done, grab the SSH or the HTTPS URL from the "Clone" field, it
should look something like this: [email protected]:bob/foo-bar.git or
https://github.com/bob/foo-bar.git. Now point the local repository to that
remote repository:
$ git remote add origin [email protected]:bob/foo-bar.gitIf the repo has a remote origin already, it can be updated like so:
$ git remote set-url origin [email protected]:bob/foo-bar.gitAnd, now, push!
$ git push origin masterThat will push the whole project to the remote repo.
On the first push, the branch needs to be defined with origin master. After
that, issuing only $ git push will work, because the branch is now tracked.
If you’re unsure whether you set up the remote origin already or not, or if it’s the right remote origin, it can checked with the following command:
$ git remote -v
origin  [email protected]:bob/foo-bar.git (fetch)
origin  [email protected]:bob/foo-bar.git (push)
Pull
It’s also possible to pull changes from a repo:
$ git pullCloning
Cloning is basically a fancy term for downloading, kinda.
In GitHub the clone URL can be easily found from the sidebar, same goes For BitBucket. The syntax is apt:
$ git clone [email protected]:bob/foo-bar.gitOr with HTTPS:
$ git clone https://github.com/bob/foo-bar.gitThat will clone the project into a /foo-bar directory. If you want to clone it
straight into your working directory, refer to it with the dot:
$ git clone https://github.com/bob/foo-bar.git .Or change the dir name:
$ git clone https://github.com/bob/foo-bar.git some-dir-nameA local repo can also be cloned by changing the URL to an absolute path:
$ git clone /path/to/local/repo/foo-barConclusion
That’s the very basics. But those commands cover about 80% of everyday Git usage.